Owl, PicPac and XNN are three tools I wrote to make image-related model training easy.
- Owl: a web UI for efficient image annotation.
- PicPac: PicPac is an image database and streaming library that preprocess the images and feed them into a deep learning framework. PicPac supports Caffe (fork), MxNet, Nervana, Theano and Tensorflow.
- XNN: a C++ wrapper that provides a unified prediction interface to all common deep learning frameworks, including Caffe, MxNet, Tensorflow, Theano and other Python-based frameworks.
- (Caffe fork with PicPac support)
The goal is to create a model that will detect and localize a target object category within images. We will use a toy dataset for car plate recognition for illustration.
================
$ git clone https://github.com/aaalgo/owl
$ cd owl
$ # Download the dataset
$ wget http://www.robots.ox.ac.uk/~vgg/data/cars_markus/cars_markus.tar
$ mkdir images
$ cd images
$ tar xf ../cars_markus.tar
$ cd ..
$ # create database
$ ./manage.py migrate
$ # import images into the database
$ find images/ -name '*.jpg' | ./manage.py import --run
$ # start the annotation server
Before starting the annotation server, we need to adjust a couple of
parameters in the file owl/annotate/params.py
ROWS = 2        # <-- images rows / page
COLS = 3        # <-- images / row
BATCH = ROWS * COLS
POLYGON = False     # set to True for polygons
VIEWED_AS_DONE = False  # see below
$ ./run.sh
The URL of the annotation UI is http://HOSTNAME:18000/annotate/.
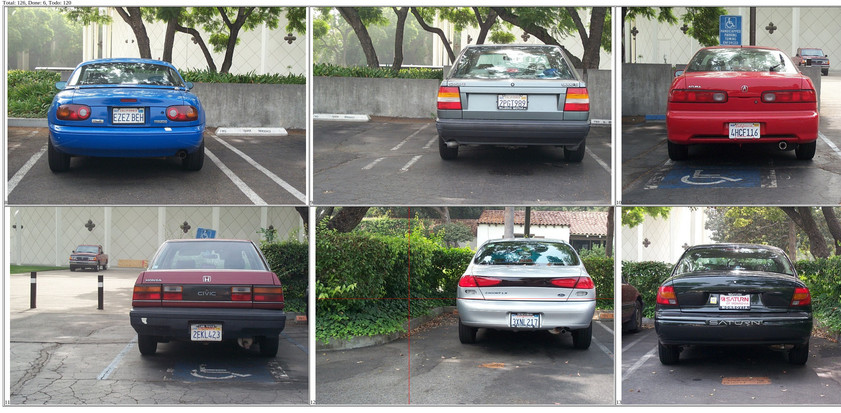
The UI is designed to minimize hand movements and therefore maximize efficiency. The following design decisions were made:
- A bounding box is automatically saved by AJAX when created.
- Refreshing page loads the next batch of examples.
The annotation process finishes when all images are annotated/viewed.
The VIEWED_AS_DONE parameter controls the behavior whether
an image viewed should be considered annotated even when no annotation
is added. Set the value to True if it is know that images without
positive regions exist. If the value is set to False and no annotation
is made to an image, it will be shown again when all other images are done.
After annotation is done, or sufficient number of annotations are collected, the images and annotations can be exported to a PicPac database by
$./manage.py export db
The file db then contains all the information needed for training.
PicPac Database
A PicPac database contains images and labels/annotations. The annotation produced by Owl is the same format used by Annotorious. Actually Owl uses an extended version of Annotorious. Below is a sample annotation:
{'shapes': [{u'geometry': {u'y': 0.5912162162162162, u'x': 0.6049107142857143, u'width': 0.10491071428571429, u'height': 0.08277027027027027}, u'style': {}, u'type': u'rect'}]}
PicPac provides a web server for viewing the content of a database.
$ picpac-server db
$ picpac-server db
WARNING: Logging before InitGoogleLogging() is written to STDERR
I0901 22:52:20.280788 29210 picpac-server.cpp:146] listening at 0.0.0.0:18888
I0901 22:52:20.281389 29210 picpac-server.cpp:148] running server with 1 threads.
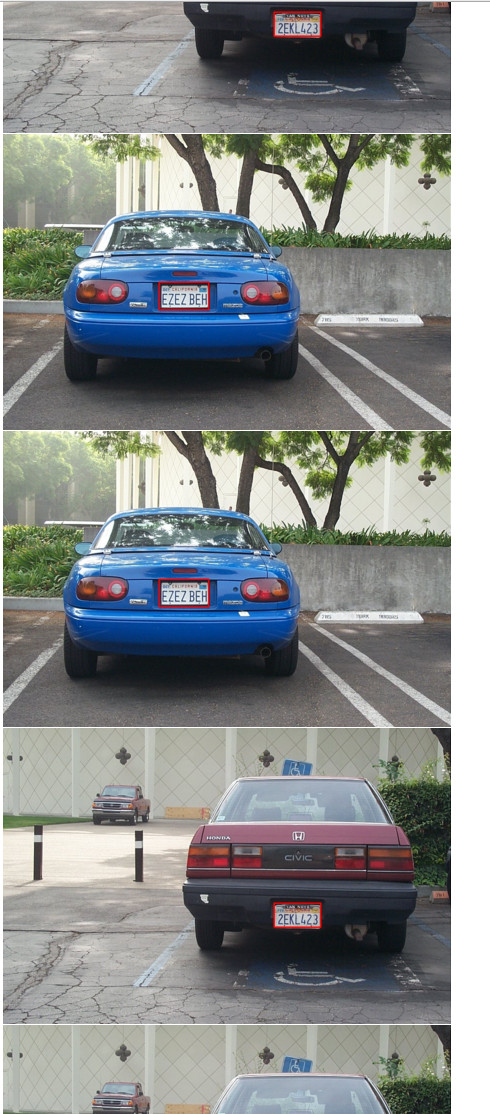
And samples with annotations can be viewed with http://HOSTNAME:18888/l?annotate=json. The red bounding box is rendered on-the-fly by the server; images and annotations are stored separately in the database.
The server accepts almost all of the perturbation/augmentation parameters,
so the effects on the training set can be visualized. For examples,
the following can be appended to the URL &perturb=1&pert_angle=20.
Sometimes when the positive regions are too small compared to the background, it is desirable to use only local areas surrounding the postive regions as training example, so that positive pixels and negative pixels are roughly balanced. The command below can be used to do the cropping.
$ picpac-split-region --width 100 --height 50 --bg 200 --no-scale 1 db db.crop
min: 0.668153
mean: 0.743567
max: 0.819342
Using picpac-server to serve db.crop shows this.

The program picpac-split-region accepts the following parameters:
- (
--size, always 50) Scale, or sqrt(width*height), of positive region. --widthoutput image wdith.--heightoutput image height.--no-scale 1. If not set, the cropped region is scaled so
positive region and negative region are of the specified size. If set, the cropped region is not scaled. Rather the size parameters are used to determine the ratio between positive and negative regions, and the output image size is determined accordingly.
Training
XNN provides a couple of templates based on public models. For example, we can train with the above database using the following command.
xnn/train-caffe-fcn.py fcn db ws
where
fcnis the template name.dbis the input database.wsis the working directory.
Training will start automatically after the command, and can be
canceled with CTRL+C. The ws directory will contain the
following:
$ ls wc
log    params.pickle  solver.prototxt       train.log       train.prototxt.tmpl
model  snapshots      solver.prototxt.tmpl  train.prototxt  train.sh
Training can be restarted with train.sh, or continued at a snapshot by supplying a snapshot name under the snapshots directory as the argument of train.sh.
While some parameter can be adjusted via arguments to train-caffe-fcn.py,
it is easier to cancel the training process, edit the file train.prototxt and then restarted. The most import parameters of train.prototxt are
annotated below.
layer {
  name: "data1"
  type: "PicPac"
  top: "data"
  top: "label"
  picpac_param {
    path: "path/to/db"
    batch: 1        # batch size, has to be 1 if image sizes are different
    channels: 3     # color channels, use 1 for grayscale images
    split: 5        # randomly split db into 5 parts
    split_fold: 0   # use part 0 for validation and the rest for training

    annotate: "json"
    anno_color1: 1

    threads: 4
    perturb: true   # enable image augmentation
    pert_color1: 10 # random perturbation range of
    pert_color2: 10 # the three color channels
    pert_color3: 10
    pert_angle: 20  # maximal angle of random rotation, in degrees
    pert_min_scale: 0.8 # min &
    pert_max_scale: 1.2 #       max ramdom scaling factor
  }
}

PicPac supports a full range of flexible configurations.  See
(documentation)[http://picpac.readthedocs.io/en/latest/] for details.
PicPac with TensorFlow
PicPac has a simple python interface with the same parameters.
    config = dict(loop=True,
                shuffle=True,
                reshuffle=True,
                batch=1,
                split=1,
                split_fold=0,
                annotate='json',
                channels=FLAGS.channels,
                stratify=False,
                mixin="db0",
                mixin_group_delta=0,
                #pert_color1=10,
                #pert_angle=5,
                #pert_min_scale=0.8,
                #pert_max_scale=1.2,
                #pad=False,
                #pert_hflip=True,
                channel_first=False
                )
    stream = picpac.ImageStream('db', negate=False, perturb=True, **config)

    ...
        with tf.Session() as sess:
            sess.run(init)
            for step in xrange(FLAGS.max_steps):
                images, labels, pad = stream.next()
                feed_dict = {X: images,
                             Y_: labels}
                _, loss_value = sess.run([train_op, loss], feed_dict=feed_dict)